
How to Add Featured Image Option to Quick Edit
Enhancing the Quick Edit functionality in WordPress to include a featured image option can significantly streamline your workflow. By default WordPress Quick Edit allows you to change post titles, slugs, dates and categories, but it doesn’t provide an option to update the featured image. This guide will walk you through the steps to add the featured image option to Quick Edit in WordPress.
Introduction
The Quick Edit feature in WordPress is a handy tool for making quick changes to your posts without having to go into the full post edit screen. However one key feature missing from Quick Edit is the ability to change the featured image. Adding this option can save time and streamline the workflow especially for websites with a large number of posts.
Setting Up the Environment
Before making any changes make sure that you have access to your WordPress site’s files. You can use a code editor and an FTP client, or a file manager plugin to access the theme or plugin files.
- Child Theme: It is recommended to make changes in a child theme to prevent losing customizations when the parent theme updates.
- Custom Plugin: Alternatively, you can create a custom plugin for this functionality.
For this guide, we’ll demonstrate using the functions.php file of a child theme. However, the same code can be adapted for use in a custom plugin.
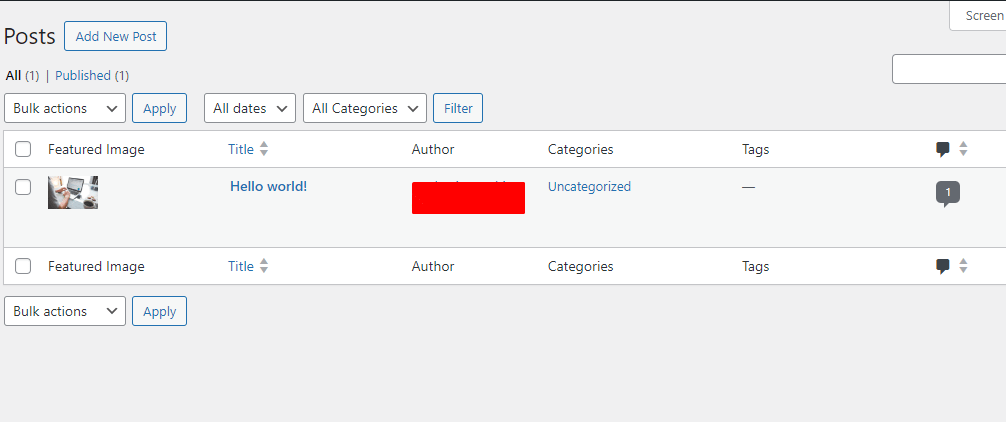
Adding the Featured Image Column
First we need to add a column for the featured image in the post list screen. This will allow us to see the current featured image and provide a place to add the Quick Edit functionality.
Code to Add the featured image Column
// Add the featured image column
function wpexpertguide_custom_featured_image_column($columns) {
    $columns['featured_image'] = 'Featured Image';
    return $columns;
}
add_filter('manage_posts_columns', 'wpexpertguide_custom_featured_image_column');

// Display the featured image in the column
function wpexpertguide_custom_display_featured_image_column($column, $post_id) {
    if ($column === 'featured_image') {
        $thumbnail_id = get_post_thumbnail_id($post_id);
        $thumbnail_url = $thumbnail_id ? wp_get_attachment_image_url($thumbnail_id, 'thumbnail') : '';
        echo '<div class="featured_image_wrapper">';
        echo $thumbnail_url ? '<img src="' . esc_url($thumbnail_url) . '" data-id="' . esc_attr($thumbnail_id) . '" style="max-width: 50px; max-height: 50px;" />' : 'No Image';
        echo '</div>';
    }
}
add_action('manage_posts_custom_column', 'wpexpertguide_custom_display_featured_image_column', 10, 2);
Enabling Quick Edit
Next we need to modify the Quick Edit functionality to include the featured image option. This involves adding a custom field to the Quick Edit form and handling the JavaScript to show the media library.
Adding Quick Edit Field
// Add custom field to Quick Edit
add_action('quick_edit_custom_box', 'wpexpertguide_custom_featured_image_quick_edit', 10, 2);
function wpexpertguide_custom_featured_image_quick_edit($column_name, $post_type) {
    if ($column_name === 'featured_image') {
        ?>
        <fieldset id="custom_featured_image" class="inline-edit-col-left">
            <div class="inline-edit-col">
                <span class="title">Featured Image</span>
                <div>
                    <a href="#" class="button custom-upload-img">Set featured image</a>
                    <input type="hidden" name="_thumbnail_id" value="" />
                </div>
                <a href="#" class="custom-remove-img" style="display:none;">Remove Featured Image</a>
            </div>
        </fieldset>
        <?php
    }
}
Since the _thumbnail_id field is automatically handled by WordPress there’s no need for additional AJAX handling or custom save actions. The default WordPress save process will manage the featured image updates.
Enqueueing the Script
Ensure the script for handling the media library and AJAX requests is correctly enqueued.
The media uploader scripts may not be included to Posts page. But you can do it with this code wp_enqueue_media();
// Enqueue the script for Quick Edit
function enqueue_custom_featured_image_script($hook)
{
    if ($hook !== 'edit.php')
    {
        return;
    }
  	if ( ! did_action( 'wp_enqueue_media' ) )
  	{
  		wp_enqueue_media(); // Enqueue WordPress media scripts
  	}
    wp_enqueue_script('quick-edit-featured-image', get_stylesheet_directory_uri() . '/js/quick-edit-featured-image.js', array('jquery'), null, true);
}
add_action('admin_enqueue_scripts', 'enqueue_custom_featured_image_script');
JavaScript to Handle Media Library
Create or update the quick-edit-featured-image.js file in your theme’s js directory with the following code:
JavaScript Code (quick-edit-featured-image.js)
jQuery(function($)
{
    // Add image
    $('body').on('click', '.custom-upload-img', function(event)
    {
        event.preventDefault();

        const button = $(this);
        const customUploader = wp.media({
            title: 'Set featured image',
            library: { type: 'image' },
            button: { text: 'Set featured image' },
            multiple: false
        }).on('select', function() {
            const attachment = customUploader.state().get('selection').first().toJSON();
            button.removeClass('button').html('<img src="' + attachment.url + '" />').next().val(attachment.id).parent().next().show();
        }).open();
    });

    // Remove image
    $('body').on('click', '.custom-remove-img', function(event)
    {
        event.preventDefault();
        $(this).hide().prev().find('[name="_thumbnail_id"]').val('-1').prev().html('Set featured Image').addClass('button');
    });

    const $wp_inline_edit = inlineEditPost.edit;

    inlineEditPost.edit = function(id) {
        $wp_inline_edit.apply(this, arguments);
        let postId = 0;
        if (typeof(id) == 'object') {
            postId = parseInt(this.getId(id));
        }

        if (postId > 0) {
            const editRow = $('#edit-' + postId);
            const postRow = $('#post-' + postId);
            const featuredImage = $('.column-featured_image', postRow).html();
            const featuredImageId = $('.column-featured_image', postRow).find('img').data('id');

            if (featuredImageId != -1) {
                $(':input[name="_thumbnail_id"]', editRow).val(featuredImageId); // ID
                $('.custom-upload-img', editRow).html(featuredImage).removeClass('button'); // image HTML
                $('.custom-remove-img', editRow).show(); // the remove link
            }
        }
    }
});
Conclusion
By following these steps and code examples, you should be able to correctly add the featured image option to Quick Edit in WordPress and ensure the current featured image is displayed when the Quick Edit form is opened. This enhancement can significantly streamline your content management workflow and make managing featured images more convenient.
Ensure to test the functionality thoroughly in a staging environment before deploying it to your live site. Feel free to reach out if you have any questions or need further assistance. Happy coding!