
How to install plugins in WordPress
If you are new to the world of WordPress and wondering how to enhance your website’s functionality with plugins? Look no further! One of the most powerful features of WordPress is its ability to utilize plugins. Plugins are like apps for your website which allows you to add new features, improve performance and customize your site without any coding knowledge. In this beginner’s guide we’ll walk you through the simple steps to install plugins in WordPress.
NOTE:
If you’re using WordPress.com, you might have noticed that the plugins menu is nowhere to be found in your WordPress dashboard. Frustrating right? Well here’s the deal: WordPress.com has its limitations and one of them is the inability to install plugins unless you’re on their business plan.
1. Install Plugins from admin dashboard
- In your WordPress dashboard, choose Plugins > Add new.
- Search for a plugin with the search bar in the top right corner. A number of results will appear.
- After finding the plugin you need in the results click Install Now. You can also click the plugin name to view more details about it.
- To use the plugin, you have to activate it. When the installation is finished (this usually takes a couple seconds), click Activate.
You can also activate or deactivate any plugin under Plugins > Installed Plugins.
2. Install Plugins Manually
If you have a .zip file of a plugin and wondering how to install it. In this section I will explain how you can install a plugin manually with a .zip file.
- You can Download the desired plugin as a .zip file from either the WordPress directory or from a third-party source. If you’re downloading from a third-party website make sure that the plugin developer is legitimate.
- From your WordPress dashboard, choose Plugins > Add New
- Click Upload Plugin at the top of the page.

- Click Choose File, locate the plugin .zip file, then click Install Now.
- After the installation process is complete you can click Activate Plugin.
3. Install a plugin via FTP
- Download the desired plugin as a .zip file from either the WordPress directory or a third-party source. If you’re downloading from a third-party website, ensure the service is legitimate.
- Extract (or unzip) the plugin file. The unzipped folder will appear with the same name as the .zip file.
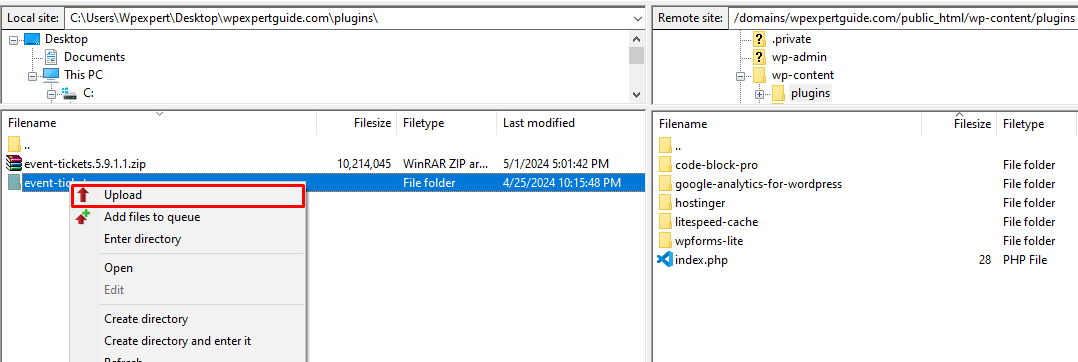
- Next, you’ll need to connect to your WordPress website’s server with FTP. To do this, You can use FileZilla or any other FTP Client to connect to your server. In FileZilla you have to enter the details Host, Port, username and password. You might need to obtain these credentials from your hosting provider.
- Once connected you have to navigate to wp-content > plugins folder
- Upload the unzipped plugin folder that you downloaded to the plugins folder
- Return to your WordPress dashboard and select Plugins > Installed Plugins. Find your new plugin and click Activate.
Congratulations! You’ve successfully learned how to install plugins in WordPress. By harnessing the power of plugins you can take your website to the next level whether you’re looking to improve SEO, enhance security or add new features. With thousands of plugins available the possibilities are endless. So go ahead explore and transform your WordPress website today!